Important: It is critical you carefully follow all the steps outlined in the article below while inputting and saving your banking information within the HRMS.
Employees who have previously input their banking information incorrectly, have experienced up-to an additional two weeks delay for their pay deposit.
Note: Due to a current system limitation, the system will not display any error messages to warn you of any incorrect input and it will allow you to save the information as-is. This will result in delayed pay as your banking information will be rejected when the payroll team tries to submit your pay deposit to your bank.
If you would like assistance with inputting your banking information or/and would like to ensure accuracy, please contact us at the HR Support Centre and we will help you input your banking information into the HRMS.
Add or Update your Banking Information or Personal Payment Method
This knowledge base article will show you how to add and update your banking information.
1. Add your Banking Information
2. Add additional Banking Information
3. Update your existing Banking Information
Steps – How to add your Banking Information
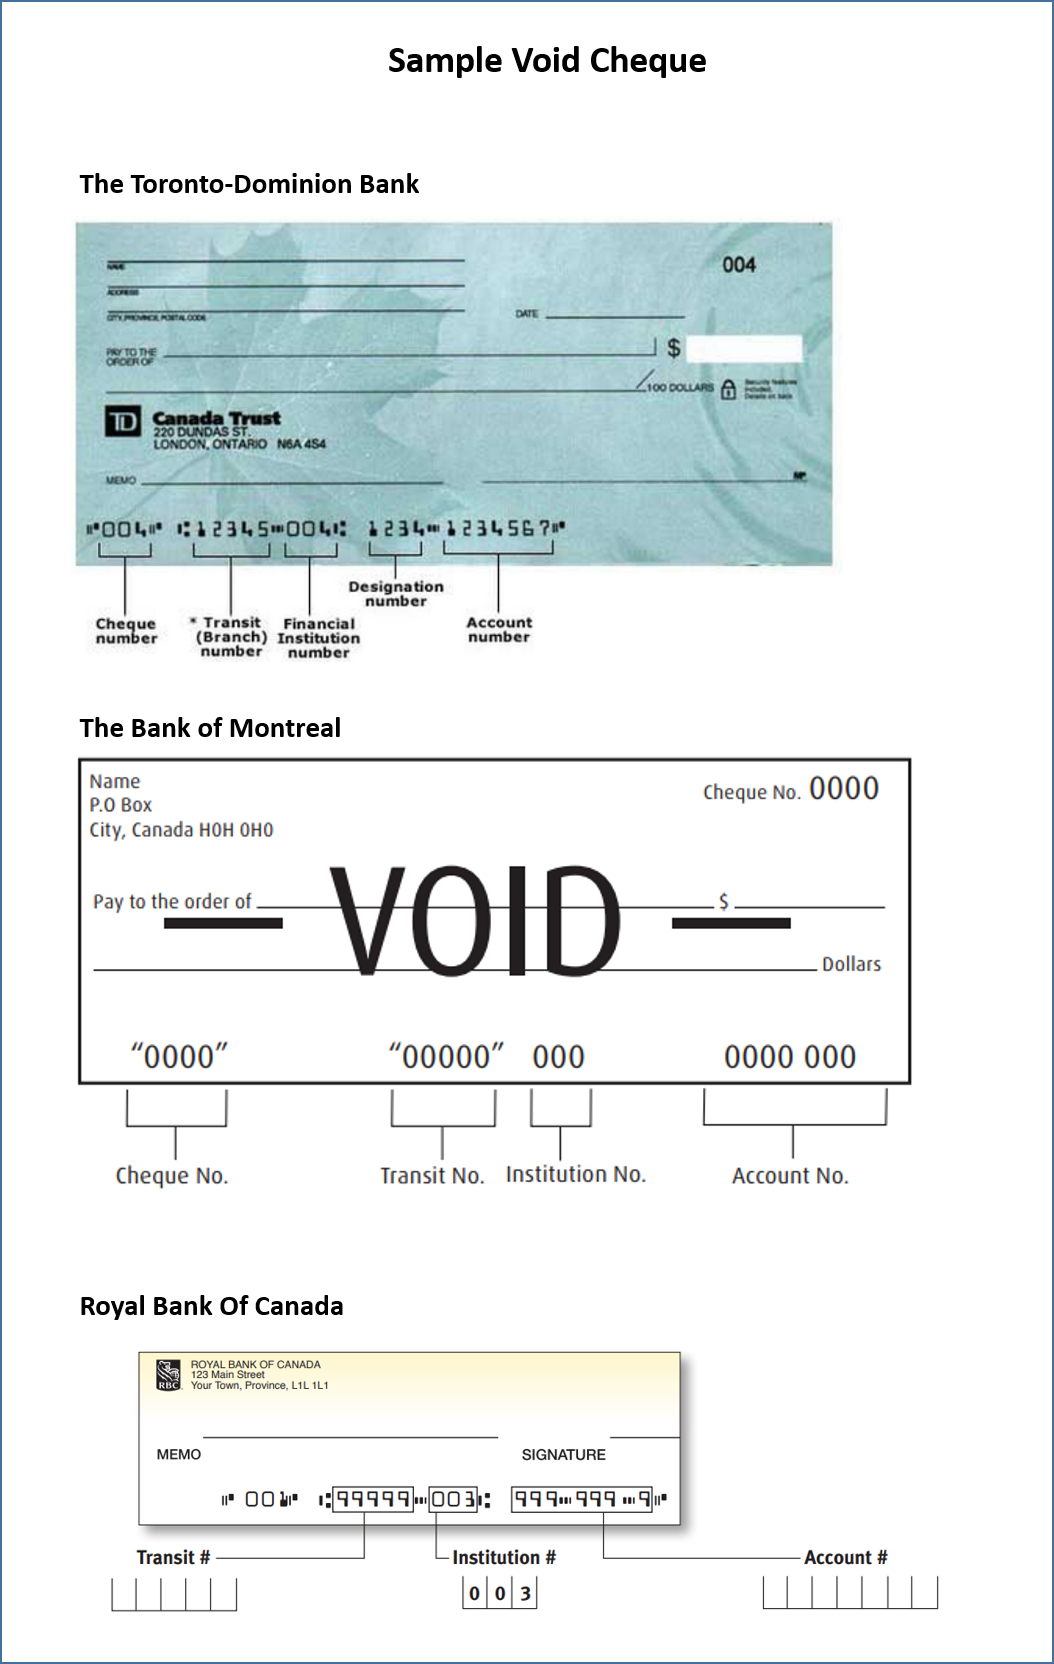
Note – You will need a Direct Deposit form or a Void Cheque from your bank for a Chequing or Savings account in order to complete this information.
It is critical to ensure you carefully follow each step and sub-step below as inaccurate or missing information may result in delayed pay. There are twelve (12) steps in this process.
1. Sign in to the HRMS using your single sign-on ID and password.
2. Click on ‘Pay’.
3. Click on ‘Payment Methods’.
4. Next to Bank Accounts, click on ‘+Add’.
5. For the Account number field, enter your bank account number.
• This information can be found on your Void Cheque or Direct Deposit form.
• Account numbers are usually 7-12 digits, and they are specific to your personal bank account.
• Please ensure the entered account number only contains numbers and it does not contain any spaces, dashes or special characters.
Example of an incorrect entry: 12-34567 (dashes are not accepted), 1234567* (special characters are not accepted), 12 34567 (spaces are not accepted)
Example of a correct entry: 1234567
6. Ensure the ‘Search Using Branch Transit Number’ box is checked.
6.1 Use the dropdown arrow next to the ‘Branch Transit Number’ field to select your Bank Branch.
• Do not type in your ‘Branch Number’ here. This may result in system errors.
• Note: Click ‘Search…’ to find your branch via the Branch Number.
6.2 Enter your Branch Number, also known as Transit or Branch Number in the ‘Branch Number’ field.
• This information can be found on your Void Cheque or Direct Deposit form.
6.3 Click ‘Search’.
6.4 Select your branch and bank from the search result. The row will highlight once selected.
• If multiple results appear, make sure to select the correct bank.
6.5 Click ‘OK’
7. Click ‘Save’ to complete the first part of the process – Add Bank Account.
Note – you must complete the following additional steps to complete the end-to-end banking process.
8. Next to ‘My Payment Methods’, click ‘+Add’.
9. In the What do you want to call this payment method? field, enter ‘Humber Pay’.
10. For the Payment Type field, select ‘Direct Deposit’ from the dropdown menu.
11. For the Bank Account field, the account number you added above would show up here.
12. Click on ‘Save’ to complete the whole process.
Alternative Way of Adding your Bank and Branch Information
If you want to add your bank first and then your branch information, you can uncheck the ‘Search Using Branch Transit Number’ box and follow the below steps to select your Bank and Bank Branch.
6. Use the dropdown arrow next to the Bank field to select your Bank.
• Do not type in your ‘Bank’ name here. This may result in system errors.
• Note: Click ‘Search…’ to find your bank via the Bank Code.
6.1 Do not fill out the ‘Bank Name’ field.
6.2 Enter your ‘Bank Code’, also known as Institution Number.
• This information can be found on your Void Cheque or Direct Deposit form.
6.3 Click ‘Search’.
6.4 Select your ‘Bank Name’ from the search results. The row will highlight once selected.
• If multiple results appear, make sure to select the first result.
6.5 Click ‘OK’
6.6 Use the dropdown arrow next to the Bank Branch field to select your Bank Branch.
• Do not type in your ‘Bank Branch’ number here. This may result in system errors.
• Note: Click ‘Search…’ to find your branch via the Branch Number.
6.7 Do not fill out the ‘Bank Branch’ or ‘Bank’ field.
6.8 Enter your ‘Branch Number’, also known as Transit or Branch Number.
• This information can be found on your Void Cheque or Direct Deposit form.
7. Click ‘Save’ to complete the first part of the process – Add Bank Account.
Note – you must complete the following additional steps to complete the end-to-end banking process.
8. Next to ‘My Payment Methods’, click ‘+Add’.
9. In the ‘What do you want to call this payment method?’ field, enter ‘Humber Pay’.
10. For the ‘Payment Type’ field, select ‘Direct Deposit’ from the dropdown menu.
11. For the ‘Bank Account’ field, the account number you added above would show up here.
12. Click on ‘Save’ to complete the whole process.
Helpful resources
Watch a Step-by-step video
View How to add your banking information instructions in a printable format.
Steps – How to add additional Banking Information
Note – You will need a Direct Deposit form or a Void Cheque from your bank for a Chequing or Savings account in order to complete this information.
It is critical to ensure you carefully follow each step and sub-step below as inaccurate or missing information may result in delayed pay. There are fourteen (14) steps in this process.
1. Sign in to the HRMS using your single sign-on ID and password.
2. Click on ‘Pay’.
3. Click on ‘Payment Methods’.
4. Next to Bank Accounts, click on ‘+Add’.
5. For the Account number field, enter your bank account number.
• This information can be found on your Void Cheque or Direct Deposit form.
• Account numbers are usually 7-12 digits, and they are specific to your personal bank account.
• Please ensure the entered account number only contains numbers and it does not contain any spaces, dashes or special characters.
Example of an incorrect entry: 12-34567 (dashes are not accepted), 1234567* (special characters are not accepted), 12 34567 (spaces are not accepted)
Example of a correct entry: 1234567
6. Ensure the ‘Search Using Branch Transit Number’ box is checked.
6.1 Use the dropdown arrow next to the ‘Branch Transit Number’ field to select your Bank Branch.
• Do not type in your ‘Branch Number’ here. This may result in system errors.
• Note: Click ‘Search…’ to find your branch via the Branch Number.
6.2 Enter your Branch Number, also known as Transit or Branch Number in the ‘Branch Number’ field.
• This information can be found on your Void Cheque or Direct Deposit form.
6.3 Click ‘Search’.
6.4 Select your branch and bank from the search result. The row will highlight once selected.
• If multiple results appear, make sure to select the correct bank.
6.5 Click ‘OK’
7. Click ‘Save’ to complete the first part of the process – Add Bank Account.
Note – you must complete the following additional steps to complete the end-to-end banking process.
8. Next to ‘My Payment Methods’, click ‘+Add’.
9. In the What do you want to call this payment method? field, you can name this payment method to reflect what this deposit will be used for. This name is for your reference to help differentiate between multiple deposits.
Note: Examples include: RRSP, Savings, Mortgage, etc.
10. For the Payment Type field, select either ‘Percentage’ or ‘Amount’ from the dropdown menu.
11. For the Payment Amount field, the account number you added above would show up here.
12. Enter your percentage or dollar amount in the field to the right.
13. For the Bank Account field, click on the dropdown menu to choose the bank account that you want to attach to this payment method.
14. Click on ‘Save’ to complete the whole process.
Alternative Way of Adding your Bank and Branch Information
If you want to add your bank first and then your branch information, you can uncheck the ‘Search Using Branch Transit Number’ box and follow the below steps to select your Bank and Bank Branch.
6. Use the dropdown arrow next to the Bank field to select your Bank.
• Do not type in your ‘Bank’ name here. This may result in system errors.
• Note: Click ‘Search…’ to find your bank via the Bank Code.
6.1 Do not fill out the ‘Bank Name’ field.
6.2 Enter your ‘Bank Code’, also known as Institution Number.
• This information can be found on your Void Cheque or Direct Deposit form.
6.3 Click ‘Search’.
6.4 Select your ‘Bank Name’ from the search results. The row will highlight once selected.
• If multiple results appear, make sure to select the first result.
6.5 Click ‘OK’
6.6 Use the dropdown arrow next to the Bank Branch field to select your Bank Branch.
• Do not type in your ‘Bank Branch’ number here. This may result in system errors.
• Note: Click ‘Search…’ to find your branch via the Branch Number.
6.7 Do not fill out the ‘Bank Branch’ or ‘Bank’ field.
6.8 Enter your ‘Branch Number’, also known as Transit or Branch Number.
• This information can be found on your Void Cheque or Direct Deposit form.
7. Click ‘Save’ to complete the first part of the process – Add Bank Account.
Note – you must complete the following additional steps to complete the end-to-end banking process.
8. Next to ‘My Payment Methods’, click ‘+Add’.
9. In the ‘What do you want to call this payment method?’ field, you can name this payment method to reflect what this deposit will be used for. This name is for your reference to help differentiate between multiple deposits.
• Note: Examples include: RRSP, Savings, Mortgage, etc.
10. For the ‘Payment Type’ field, select either ‘Percentage’ or ‘Amount’ from the dropdown menu.
11. For the ‘Payment Amount’ field, the account number you added above would show up here.
12. Enter your percentage or dollar amount in the field to the right.
13. For the ‘Bank Account’ field, click on the dropdown menu to choose the bank account that you want to attach to this payment method.
14. Click on ‘Save’ to complete the whole process.
Steps – Update your existing Banking Information
1. Sign in to the HRMS using your single sign-on ID and password.
2. Click on ‘Pay’.
3. Click on ‘Payment Methods’.
4. Under ‘Bank Accounts’, click on the pencil icon next to the Bank Account you wish to update.
5. Edit the Banking information as required.
6. Uncheck ‘Active’ if you want to delete the account.
7. When you have finished making the required updates, click ‘Save’.
8. Under ‘My Payment Methods’, click on the pencil icon next to the Payment Method you wish to update.
9. Click on the Bank Account dropdown menu to select the Bank Account you just updated.
10. Click ‘Save’ to save the whole process.